Hyper-v Standalone Installation HD
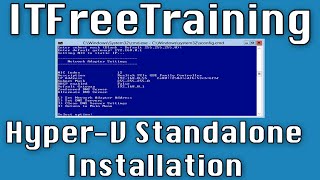
This video looks at how to install the free standalone version of Hyper-V from Microsoft. Check out http://YouTube.com/ITFreeTraining or http://itfreetraining.com for more of our always free training videos. The video looks at the complete process from download from Microsoft to configuring the server and adding it to the domain. Check out http://YouTube.com/ITFreeTraining or http://itfreetraining.com for more of our always free training videos. Demonstration downloading Hyper-V 00:32 To download Hyper-V open Internet Explorer by selecting the shortcut in the quick launch bar. 00:36 From Internet Explorer, go the to address http://technet.com This download is not available from Microsoft Download center. 00:48 From the Technet website, select the menu option downloads at the top of the page. 00:56 On the download page select the option “Windows Server 2012 R2”. 01:08 Expand the section Hyper-V Server 2012 R2 01:15 Before you can download Hyper-V Server 2012 R2 you will need to sign in to Technet. If you do not have a login for Technet you can create one for free. 01:26 From the downloads, press the button “register to continue” under the section “Hyper-V Server 2012 R2” 01:33 Change any details here that are not correct. You will need to select the language that you want to download. In this case the language English was chosen. 01:50 At the bottom of the screen press the continue button to start the download. 01:58 Technet uses its own downloader to perform downloads. Once the option “download the installer” is selected, press the button run to run the download installer. 02:11 From the download manager select “I Agree” to agree to the license and then press next. 02:13 When prompted saved the download to the desktop. 02:22 You may receive a Windows security alert asking for changes to be made to the local firewall. Press allow access if this appears. 02:36 To see the process of the download, scroll to the top of the web page and look for a black bar indicating how much has been downloaded. Demonstration downloading and using Rufus 02:52 You will now use the ISO downloaded to install the Hyper-V server by transferring the ISO to a USB drive. 3:13 Navigate to ‘https://rufus.akeo.ie’ in the address bar. 3:25 Scroll down to the bottom and select the Download link 3:30 You do not need to install Rufus, you can merely Run it. 3:38 Rufus will first ask to check for updates, click No. 3:48 If you need a different language, click the World icon at the top of the screen. 3:58 Select the USB device you’d like to use under Device dropdown list 4:06 Select the icon that looks like a CD drive and browse to the ISO file you downloaded earlier and click ‘Open’ 4:20 Leave the rest of the options as is and press ‘Start’ to create the bootable flash drive 4:22 Click ‘OK’ on the warning message that all USB data will be erased to begin the creation 4:38 Rufus will erase all the data on the flash drive and create the boot device. This process will take s
 HD
HD HD
HD HD
HD HD
HD HD
HD HD
HD HD
HD HD
HD HD
HD HD
HD HD
HD HD
HD HD
HD HD
HD HD
HD HD
HD HD
HD HD
HD HD
HD HD
HD HD
HD HD
HD HD
HD HD
HD HD
HD HD
HD![[ETS2] How To Download + Install Road To Asia MAP MOD in Hindi | Euro Truck Simulator 2](https://i.ytimg.com/vi/tJun7d_UlkM/mqdefault.jpg) HD
HD HD
HD![[MOTO X PLAY] How to UNLOCK BOOTLOADER, ROOT, INSTALL TWRP, FLASH ROM, INSTALL GAPP IN MOTO X PLAY](https://i.ytimg.com/vi/eZpRh1mtjsA/mqdefault.jpg) HD
HD HD
HD HD
HD HD
HD