ENGLISH: HMF Set-up Guide HD
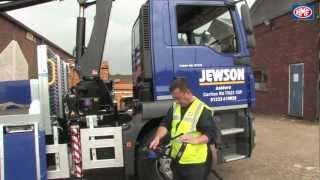
EVS Set-up Guide Welcome to the EVS set-up guide to help to get the most out of your HMF crane. Upon entering the vehicle, check gearbox is in neutral, start the engine, depress the clutch. Wait 4 seconds then engage the pto. It can be located to the right hand side of the blue, crane control panel, in the centre of the vehicle dash board. The control panel indicates whether the crane and stabiliser legs and beams are correctly stowed or not stowed, and a chest pack not stowed warning, plus a buzzer override. Then please remove the remote control chest pack from its docking station in the centre of the vehicle cab next to the gear lever. Once you have disembarked the vehicle and you are ready to use the crane, the crane must be first correctly set-up. To activate the remote chest pack the emergency stop button must be released. This done by rotating the button clockwise until the stop button mechanism releases. Then turn on the chest pack with the On-Power button to the right of the emergency stop. Once the chest pack has powered please press the green function button. This activates the RCL 5300 and starts communication of the remote control with the crane. The crane will now start up in stabiliser mode. This can been seen from the top left hand corner of the remote lcd screen or from the RCL controller. It is indicated by a flashing "S" in the screen and two flashing stabiliser legs. Before the crane can be operated both stabiliser legs MUST be in contact with floor and the flashing "S" symbol constant. To extend a stabiliser beam, release the secondary leg latch. Then press the ID button on the side you want extend. Then press and HOLD switch number 2 on the chest pack to the left hand side. This must be held over within 10 seconds of pressing the ID button. Whilst holding switch number two the left, the main paddle levers become the controls for the stabiliser legs. Lever number two is for the Near Side Beam, Lever number 3 the Off Side Beam. Lever 4 the Near Side leg and Lever 5 the Off Side leg. So to extend the leg on the Near Side press paddle lever number 2 forward until your leg is sufficiently extended. And then press paddle lever number 4 forwards to deploy the stabiliser leg. When setting the stabiliser legs always try to level the vehicle as much as possible, without raising the wheels of the vehicle off the ground, with the assistance of the spirit levels on each side of the crane. When each stabiliser leg is deployed an extended tone is emitted from the RCL system to indicate the stabiliser is in contact with the ground and the leg shown in the RCL display will stop flashing. Once both legs are in contact with the floor, the whole display including the "S" will be constantly illuminated and not flashing. At this point the crane is ready to be calibrated for crane mode. Now press the yellow function button twice to switch the crane from stabiliser mode into Crane mode. Now for the important part of calibrating the system. Pull p
Похожие видео
 HD
HD HD
HD HD
HD HD
HD HD
HD HD
HD HD
HD HD
HD HD
HD HD
HD HD
HD HD
HD
 HD
HD HD
HD HD
HD HD
HD HD
HD HD
HD HD
HD HD
HD HD
HD HD
HD HD
HD HD
HD HD
HD
 HD
HD
 HD
HD![[Review] Atomic AMZ 1/27 4WD RC Car](https://i.ytimg.com/vi/u7Jsw8IW-zY/mqdefault.jpg) HD
HD HD
HDПоказать еще