HOW TO REPLACE LOUD COMPUTER FAN | INSTALL REPLACE LOUD QUIET PC FAN | CPU DETAIL QUICK FIX TUTORIAL HD
BEQUIET DARK ROCK: http://amzn.to/2AuqQbu BEQUIET! http://amzn.to/2BI2awc THERMAL PASTE: http://amzn.to/2jOi546 COMPUTER COMPONENTS: http://amzn.to/2jOtqRH Hi this is Ron from Ron’s Tron Tutorials. I have a AMD computer here with a standard CPU fan that is too loud. The standard fans tend to be lower quality and wear out quicker over time. Especially working on the computer for an extended period of time, a loud fan can be really annoying. The background noise is also noticeable if you use your computer to record audio or watch movies. That’s why today, I’m going to show you how to replace it with a much quieter CPU fan. I ordered a fan. It is 13.5mm in diameter which is considerably larger than a standard fan allowing it to rotate slower, which helps to reduce the operating noise. First I take off the computer case cover. Now I’m taking out the old fan. To unlock this fan I lift up the lever on the side. I remove the fan carefully because the processor is underneath it. You can see here that the new fan is much larger than the old one. Next, I’m going to remove the AMD retention module from the motherboard. To do this, unscrew these four screws. Before moving on, unlock the processor by moving up the lever and it should come out easily. I then place it in the old packaging that the processor came with initially. This way i can clean the old thermal paste off without damaging the pins on the back. For this, I use a rag and some brake cleaner because it evaporates and doesn’t leave any residue. Don’t spray too much, you only need a small amount and the paste comes right off. This is best done outside or in a well-ventilated room. Now that the processor is nice and clean, we can put it aside and go back to the computer. I’m going to install the AMD kit that came with the fan. It comes with a backplate that goes on the back side of the mainboard, which means we have to take it out. First, I’m taking out the graphics card and putting it aside and then unplugging the connections from the motherboard. Now you have to unscrew the motherboard from the case. There are six screws, in this case. Carefully take the motherboard out of the case. Set the case aside and turn the motherboard around to locate the old backplate. I can pull this off because i already loosened the 4 screws from the front. Now place the backplate on the rear side of the motherboard and insert the M3 screws that came with the fan. It’s easier if you take the bracket off and push the screws through. This bracket has a plastic coat(layer) where it goes on the motherboard. Make sure all 4 screws are in and insert the backplate through the motherboard. Hold it in place while you turn the motherboard around. Now place the washers over the 4 screws. The washers have an inner ridge. Make sure you place these with the small inner ridge face side down. Next fasten the backplate onto the motherboard using the C-profile spacers. Press these onto the notches in the screws until they click in
 HD
HD
 HD
HD HD
HD HD
HD HD
HD HD
HD HD
HD HD
HD HD
HD![How To Check CPU Temp - The Easiest Way To Monitor GPU Temperature [BEGINNER'S TUTORIAL]](https://i.ytimg.com/vi/EfEFmKe9Cfo/mqdefault.jpg) HD
HD HD
HD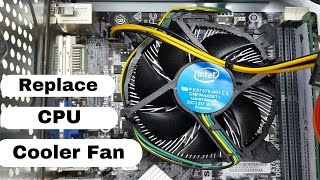 HD
HD HD
HD HD
HD HD
HD HD
HD HD
HD HD
HD HD
HD HD
HD HD
HD